Contact Us
Site Map
email :
brian@youngarchitectureservices.com
phone: 317-507-7931
|
Architecture Firm Contact Us Site Map email : brian@youngarchitectureservices.com phone: 317-507-7931 |
|
Click
a
Picture for other topics that might interest you


Kitchen Interior Design Remodeling the Bathroom House Addition Plans Bedroom Interior Design House Additions Residential Home Floor Plans |
Home Additions Home Remodeling 1950's Ranch Home Remodel Remodeling a One Story Home Basement Remodeling Bathroom Remodeling Bedroom Remodeling Kitchen Remodeling Family Room Addition Sunroom Addition Screen Porch Addition In Law Addition 2nd Floor Addition Bedroom Addition Extreme Home Makeover Home Deck Design Home Remodeling Contractor HOUSE PLANS BY SQUARE FEET 1000 Square Foot House Plans 1500 Square Foot House Plans 2000 Square Foot House Plans 2500 Square Foot House Plans 3000 Square Foot House Plans 3500 Square Foot House Plans 4000 Square Foot House Plans 4500 Square Foot House Plans 5000 Square Foot House Plans + HOUSE PLANS BY SIZE Large House Plans 1 Story 5 Bedroom House Plans 1 Story 4 Bedroom House Plans 2 Story 4 Bedroom House Plans 1 Story 3 Bedroom House Plans 2 Story 3 Bedroom House Plans 1 Story 2 Bedroom House Plans Floor Plans for Homes Narrow Lot House Plans Small House Plans HOUSE PLANS BY STYLE Bungalow House Plans Craftsman House Plans Colonial Style House Plans Contemporary House Plans Cottage House Plans French Country House Plans Modern House Plans Prairie Style House Plans Ranch House Plans Stone House Plans Traditional House Plans INTERIORS DESIGNS Architectural Lighting Ideas Home Bar Ideas Modern House Ideas Interior Detail Ideas Ideas Living Room Ideas Dining Room Ideas Cabinet Ideas Office Space Planning Ideas Basement Ideas Bedroom Ideas Bathroom Ideas Kitchen Ideas Decoration in the Home Beautiful House Ideas CABINET BLUEPRINT DESIGNS TV Cabinet Blueprint Drawings Home Bar Cabinet Blueprints Finished Basement Drawings Wall Unit Blueprint Drawings Custom Cabinet Drawings ARCHITECT SERVICES Designing a Home Addition w/ Our Architect Remodeling a Home w/ Our Architect Designing Home Bar Cabinets w/ Our Architect Designing a House with Our Architect CAD Drawing of House Plans 3D Home Model Rendering |

     |
Article:
How to Remodel a Kitchen with Design Tidbits to Increase
your Storage Space and Efficiency but decrease your Kitchen Size
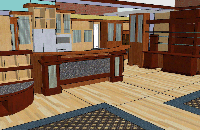
I am a big believer in the "Open Floor Plan" which has fewer walls and doors, with rooms tied together as open visual space. Keeping the Great Room, Dining Room and Kitchen "open" (meaning no walls between them) help make all the rooms "feel bigger". The wall removal helps facilitate the open communications between the rooms. You don't feel isolated in the kitchen when wall barriers are removed, and thus people don't have to step into the kitchen to talk to you. They can do it from outside the kitchen zone. Keep you ceilings tall by putting in scissors trusses.You can make your walls 8 foot tall, but by adding the scissors truss (peak at 13 to 14 feet) will give you lots of visual space and a less confined feeling. And get a skylight in the kitchen. The opening for a skylight can be much bigger than the skylight itself. Get the opening from the peak of the ceiling to the edge of the wall, and locate the skylight near a perpendicular wall so it will disperse the light throughout the kitchen. Put some "niches" in your tall walls above the 8' line for greenery, or statues. Put "puck" lights in these niches for accent lighting. By using just 3
tall cabinets
(2'
deep 7’ tall) at the rear of the kitchen, and the open floor plan, this
allows
all the rest of the kitchen to have 36" tall base cabinets and
countertops, without overhead cabinets. Eliminating overhead cabinets
(and the associated
wall) just gives you an incredible open feeling. The kitchen isn't as
nearly as
cramped. The windows and natural light come from the windows of the
other rooms
and skylights, meaning you don't have to waste valuable kitchen wall
space for
windows. Place your sink and cooktop to face the open rooms. In
the corners of the kitchen,
install cabinets at 45 degrees to the
adjoining cabinets rather than a “blind”
cabinet or “lazy susan”. While a 45 degree cabinet has some dead space,
it
utilizes more space than a “lazy susan”, mainly because the cabinet
shelves and
drawers are square, and a “lazy susan” is round. Put
a pantry in the corner
between
your tall cabinets.
It doesn't have to be very big (4' x
4') and being in the
corner will utilize all the corner "dead" space. The pantry would
have a 2’ opening at 45 degrees to the adjoining cabinets. The pantry
walls
could be 2x4 framed with drywall or 3/4” , but the wall
shouldn’t be
taller
than the height of the tall cabinets. This allows for crown molding (if
you use
it) to also be used on the pantry.
Have
the pantry open at the top, especially if there is a skylight above, to
allow
daylight into the pantry. Have
shelves
from the floor to top of wall. Put a "cabinet door" (same as the rest
of your tall cabinets) on the pantry entrance, not a frame door like
you'd use
in the bedroom. By having a cabinet door the pantry, and the pantry
walls at
the same height as the cabinets, the pantry looks like a cabinet rather
than a
drywall opening. In
the pantry, install a counter
with 4 electric outlets. This
is where the coffee maker,
toaster, electric can
openers, etc are to be permanently located. It keeps them off your
kitchen
countertops, but they are always available to use. No need to store
them in
your cabinets and no need for appliance garage cabinets. This leaves
your main
kitchen countertops "clean" (nothing on them) and more open for the
food prep you need to do. Put an upper counter 8" above your countertops (i.e. 6" wall, 2" thick upper counter). In an "open floor plan" concept, this 8" of height hides a "messy" kitchen counter from view to the other rooms. It also gives you plenty of room for multiple electric outlets in the in the 6" wall areas. The 6" tall wall is the right height for 6" ceramic wall tile. The upper counter is 44" (elbow height) a perfect height for "leaning". This allows your guests to “lean” on the counter (out of the kitchen) and talk with you while you’re preparing food (in the kitchen). It’s also a good height for serving food or for tall stools as a breakfast bar. Not all of the upper counters have to be the some width. Some sections may be 9" wide (just a top to the kitchen partition, while other sections of the upper counter can be 24'' wide, for serving food or as a breakfast bar. Now…I'm discussing this portion last because different clients use their kitchens differently, and every person has their own taste. I'm not talking about the size (although it's related), but how many people they want in a kitchen. Some clients want everyone in the kitchen, including guests and relatives, to help in cooking or processing the meal, which means a larger kitchen to handle the people. Others don't want anyone but a few people in kitchen, so they're not tripping over people to get the meal finished, which means a smaller more efficient kitchen. Most modern
house designs have
the
kitchen open to the garage
or rear door and open to family
room and/or other
rooms such as breakfast areas, dining rooms, or hallways. This means
the
kitchen has multiple openings to handle these functions. Some kitchens
also
have "island" cabinets/countertops with two or more openings. All the
openings to the kitchen allows people to come in, stand around, or pass
thru
the kitchen from Point A to Point B somewhere else in the house. Also,
one of
the quirks of our human psychology is everyone eventually ends up in
the
kitchen. This design concept uses the kitchen as a "traffic
corridor". These kitchens need a large amount of space to handle the
volume of traffic. Again, some clients love the flow of people in and
out of
the kitchen. They just need a larger kitchen space for all this happen Other clients
think the
"traffic corridor" kitchen
concept "clogs" up the kitchen
with unnecessary and unwanted people. Count me in the
"keep-the-unnecessary-people-out-of-the-kitchen" category. I like to
keep the kitchen open and inviting, I just don't want the extra bodies
while
the meal is being prepared. By keeping the extra bodies out, the
kitchen can be
smaller and more efficient, meaning fewer steps between the
refrigerator,
cooktop and sink. Keeping people
out of the kitchen
is
very easy to do in your
design, just make it difficult for
them to get in. Use
a wrapping countertop with just one (1) countertop opening into the
kitchen,
and locate that opening in the most difficult spot to enter the
kitchen. This,
along with the "open floor plan" is the most effective way to prevent
unwanted kitchen traffic. The single kitchen entrance will
psychologically keep
them out of the kitchen zone, while the open floor plan (no walls)
allows you
to communicate with family and guests, while keeping them out of the
kitchen. With the tidbits I've discussed above and by keeping the people out of a kitchen, a kitchen size of 16'x10' or 12'x12' is very effective, with tons of storage. Making the kitchen a "traffic corridor" for people to pass through, the kitchen would need to double in size, and you're not gaining storage space with that size because all the openings to the kitchen are eating up what could have been used for cabinets. In regards to lighting, most kitchens have a few main way of lighting (or combination of these) A. Light in the ceiling fan B. “Can” lights in the ceiling C. Under-cabinet lighting (usually puck lights or fluorescent strips) I
generally reject all of these
lighting concepts.
With a light in the ceiling
fan, you always have the light
at your back, meaning you're casting shadows onto everything you do on
the
countertop. Can lights are "energy hogs" because they cut large holes
in your insulation, and use inefficient incandescent lighting (usually
75
watt). I don't use
overhead cabinets so
therefore eliminate under-cabinet lighting, which is sometimes expensive With
the tall ceilings of a
scissors
truss, I like to use MR16 adjustable light fixtures, not
"can"
lights. The MR16's are usually know as “strip” lighting. However,
you'll want
to use a "plate" instead of a "strip" for the fixture
connection. By using a plate, the MR16 uses a standard electrical box,
so a
smaller hole in your insulation blanket compared to a “can” light, and
they
pump out twice as much light for less wattage (usually 50 watts) than a
"can" light. MR16 fixtures can be very small (so you don't see them)
and not very costly (around $20). MR16's are adjustable, meaning you
can point
the light where you want it. A "can" light points light perpendicular
to the ceiling. In a sloped ceiling, that's not good. Locate your
lights above
the countertop to eliminate shadows, along your major work areas
(sinks,
cooktop, cutting and prep areas) and then distribute evenly along the
rest of
the countertops. You really don't need lights elsewhere other than for
accent
lighting. The lights above the counters will be more than enough,
assuming
you're keeping the kitchen smaller. |